Terraform Infrastructure as Code Basics
Overview
During the course of this article we will cover some basic concepts in the Terraform application to create AWS resources. This article assumes you have the following:
- Terraform configured on your local machine.
- An AWS Account.
- A VPC (the default VPC will suffice).
- A Subnet that has the ability to allocate Public IP's within your VPC.
- An SSH key configured in your AWS Account
- An AWS Access and Secret Key
Terraform Providers
In our previous article, we discussed Terraform Providers. Expanding upon the last article; Terraform has the ability to manage not only Public Cloud resources but other resources including but not limited to Grafana, VMWare vSphere, and Docker. In this article we will discuss two providers in particular: the AWS and Template providers. Using these, we will create an EC2 Instance and apply a template created user-data file to change the hostname and reboot.
Our File Structure
While you can contain all your code in a single .tf file, it's best practice to separate your code into multiple files for easier organization and reading. Since Terraform runs in the current directory unless the -target flag is specified it will apply all code in the current directory (and sub directories if specified in the HCL). We will also include a template file for our user data.
- main.tf
- vars.tf
- outputs.tf
- main.auto.tfvars
- user-data.tpl
You may also separate your code into individually named files such as ec2.tf and sg.tf for easier organization and reading.
Provider Setup
Like the AWS CLI, the AWS Provider can authenticate to AWS leveraging the 4 standard authentication methods provided natively.
- Static Credentials
- Environment Variables
- Shared Credentials File
- EC2 Roles
For our purposes, we will leverage the Environment Variables method with an AWS Access and Secret Key.
export AWS_ACCESS_KEY_ID=my-access-key-id
export AWS_SECRET_ACCESS_KEY=my-secret-access-key
export AWS_DEFAULT_REGION=us-east-1
Terraform Code
We will first start off by creating our variables by making our vars.tf
variable "vpc_id" {
  type = string
}

variable "subnet_id" {
  type = string
}

variable "instance_name" {
  type = string
}

variable "keypair" {
  type = string
}

variable "instance_type" {
  type = string
}
We can now populate our variables with values from our main.auto.tfvars.
vpc_id="vpc-myvpcid"
subnet_id="subnet-mysubnetid"
instance_name="myhost"
keypair="mykeyname"
instance_type="t3.small"
We will create our template file user-data.tpl user-data script to be used later by our main.tf
#!/usr/bin/env bash

hostnamectl set-hostname ${instance_name}

reboot
Now that we have our variables and our template, we can continue by creating our resources in our main.tf
provider "aws" {
    region      = "us-east-1"
}

## This grabs our own external IP address to use later when creating our security groups ##
data "external" "myipaddr" {
  program = ["bash", "-c", "curl -s 'https://api.ipify.org?format=json'"]
}

## This grabs the latest Ubuntu 18.04 Bionic Beaver AMI ##
data aws_ami "bionic" {
  owners = ["099720109477"]
  filter {
    name = "name"
    values = ["ubuntu/images/hvm-ssd/ubuntu-bionic-18.04-amd64-server-*"]
  }
  most_recent = true

}

## Create a security group with your local public IP to grant SSH access ##
resource aws_security_group "my_security_group" {
  name = "my_security_group"
  vpc_id = var.vpc_id
  ingress {
    from_port = 22
    protocol = "tcp"
    to_port = 22
    cidr_blocks = [
      "${data.external.myipaddr.result.ip}/32"
    ]
  }
  egress {
    from_port = 0
    protocol = "-1"
    to_port = 0
  }
}

## We can create our templated file that will be rendered into our user-data ##

data template_file "user_data" {
  template = file("./user-data.tpl")
  vars = {
    instance_name = var.instance_name
  }
}

## Now we will create our instance with our created templated user-data and security group id's ##

resource aws_instance "my_ec2" {
  ami = data.aws_ami.bionic.id
  subnet_id = var.subnet_id
  instance_type = var.instance_type
  key_name = var.keypair
  associate_public_ip_address = true
  vpc_security_group_ids = [aws_security_group.my_security_group.id]
  user_data_base64 = base64encode(data.template_file.user_data.rendered)
  ebs_optimized = true
  root_block_device {
    volume_type = "gp2"
    volume_size = 20
    delete_on_termination = true
  }
  tags = {
    Name = var.instance_name
  }
}
Now that we've created our main.tf, next we will finally create our outputs.tf so we can acquire our Public IP address once the instance is created.
output "public_ip" {
  value = aws_instance.my_ec2.public_ip
}
One thing you may have noticed is how I call results from one resource into another. I use the id of the created security group by calling aws_security_group.my_security_group.id in the aws_instance resource. This gives a level of native ordering within Terraform. This means the aws_instance has an implicit dependency on the aws_security_group resource before it can be created. If you want to employ an explicit dependency or ordering on resources that don't natively need something from another resource you can leverage the depends_on attribute of that resource.
Lets Run That Terraform!
Phew...alright, we've got all our Terraform written. Now its time to initialize our Terraform State and create our infrastructure!
But wait...what's Terraform State? Terraform State is the result of the declared resources defined in our .tf files. This is where all of our infrastructure definition will be stored. Our example is leveraging a local state file.
Alright, enough of that informative mumbo-jumbo. Let's get Terraforming!
Terraform Init
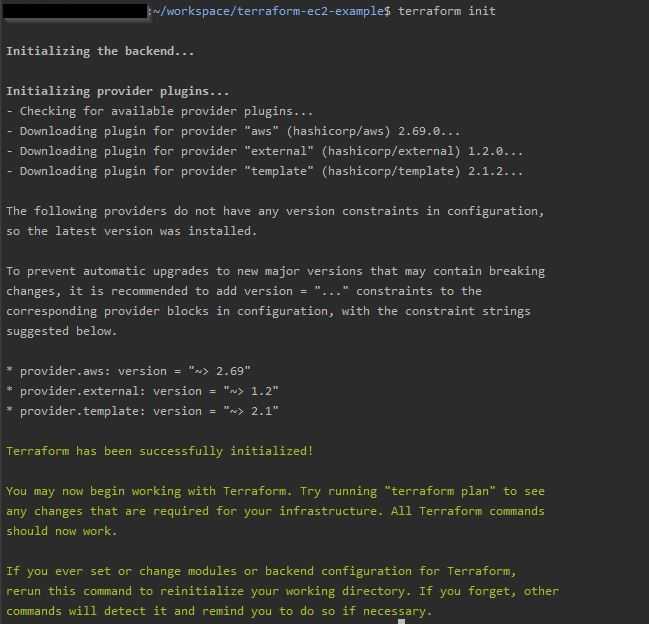
The Terraform Init command creates our localized .terraform directory, downloads our modules and providers, and creates and helps manage our state.
Alright, with that out of the way, we can run our Terraform init command, run the terraform init on our command line.
Here we can see our backend being initialized, our plugins being downloaded, and other setup commands Terraform needs to run.
Terraform Plan
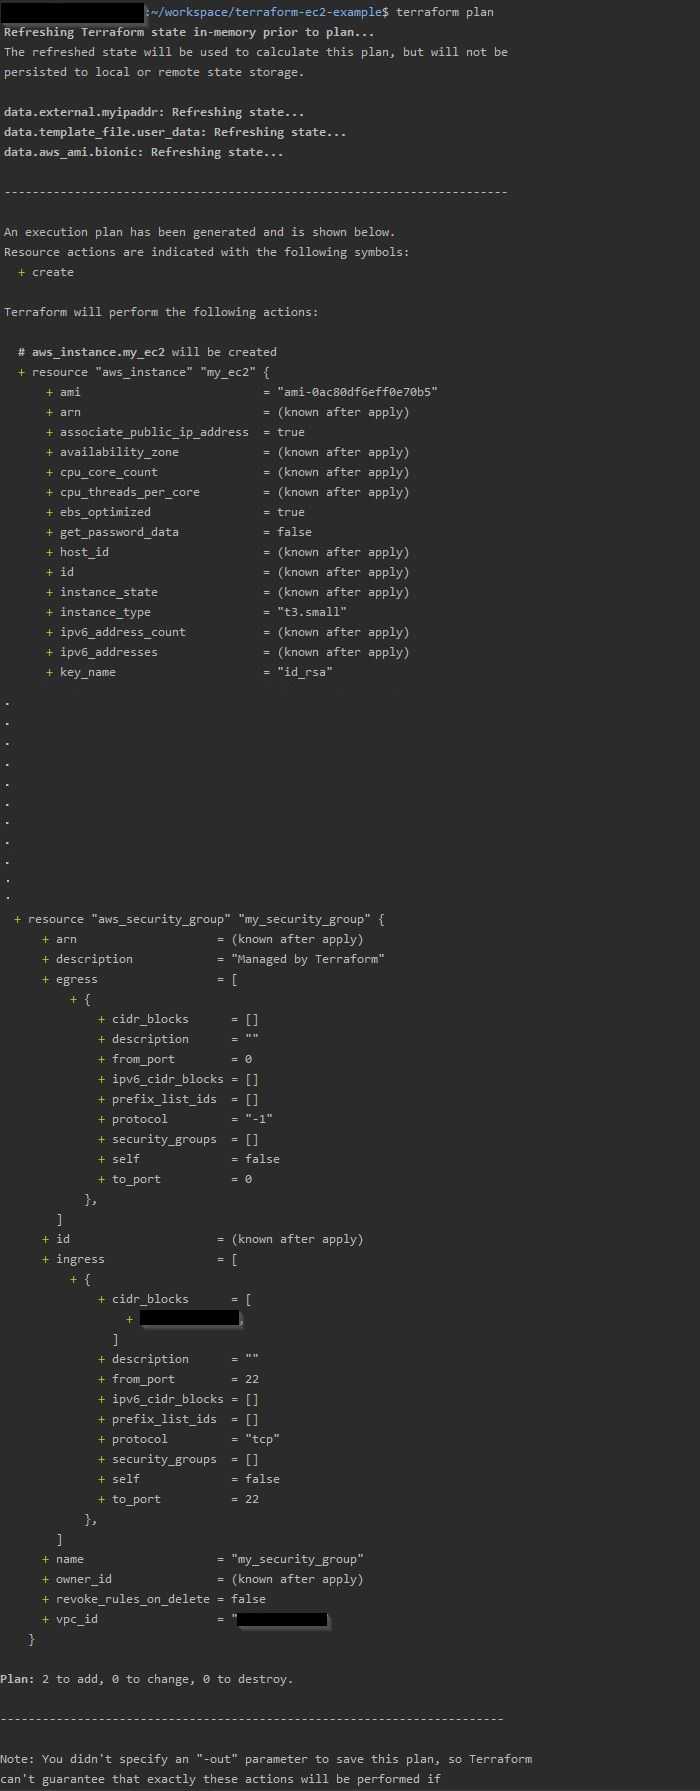
The Terraform Plan command does not create Infrastructure or add anything that is not immutable to our existing Terraform State. It simply checks what changes will be applied against the already created resources within the state and refreshes things like data items based on their current result.
Let's run our plan command and see what comes back.
Wunderbar! We have a plan. Our next step is to run an apply.

Terraform Apply
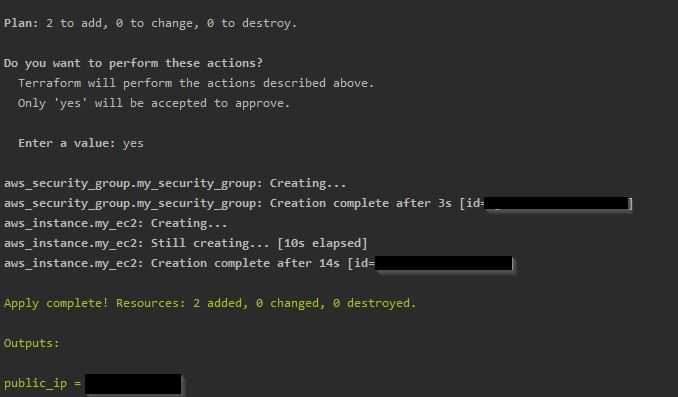
A Terraform Apply will be the command we use to build our Infrastructure. Although there is a flag to -auto-approve changes, we will be prompted (with the same result as our Terraform Plan command) to apply our changes. Once we accept them, our output will show the resources being created.
Here we can see our resources have been created, and our outputs have provided us a Public IP (redacted).
SSH Time!
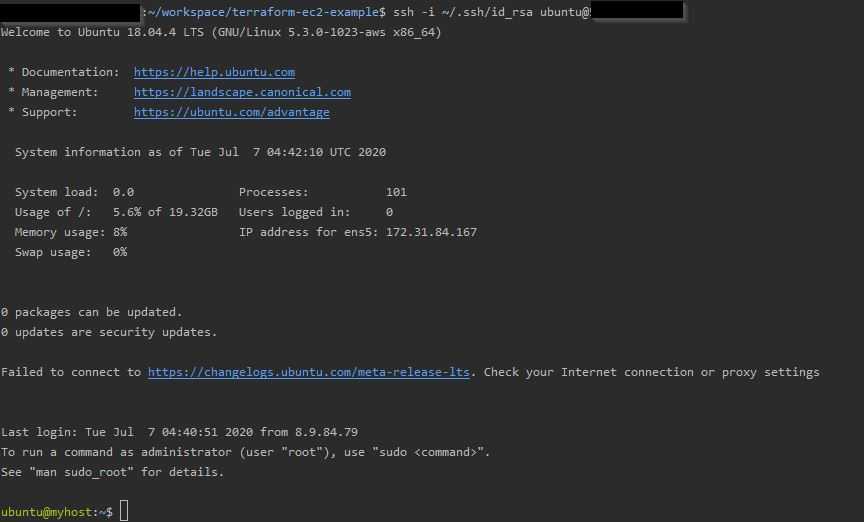
Now that all of our resources are created, we can access our instance via SSH since our Public IP was whitelisted as part of our Terraform.
Here we can see our User Data has applied and renamed our host to our variable value myhost.
Terraform Destroy
Finally, now that our EC2 Instance is up and running, we are going to blow it and the associated Security Group sky high. Not really, but who doesn't like a bit of drama.
To do this it operates very similar to how a terraform apply works, we just need to run a terraform destroy and accept it. Once that's done our state should be mostly empty and our instance terminated in AWS.
Some final items
You may have noticed that in your local directory structure there are now two additional files, the terraform.tfstate and the terraform.tfstate.backup. These are parts of what I had mentioned earlier where Terraform creates its declarative definition of your Infrastructure. In our next article, we will discuss new secure ways to manage our state so it is not part of our code base but remotely accessed during our Plans, Applies, and Destroys.

Whats Next?
I hope you've enjoyed this little foray into the world of Infrastructure as Code basics with Terraform. In our next article we will dive into more advanced concepts like Remote State Management, Modules for repeatable code, and other providers, such as Kubernetes.


