Ready to Work Together?
Let's discuss how our expertise can help transform your business.


If you're reading this, you probably know what a CI/CD pipeline is.
If you don't, no big deal -- it's just yet another acronym.
CI/CD short for "continuous integration and continuous delivery", which when we boil it down, simply means that everything between your git commit and a deployment works auto-magically so you can rest your fingers and watch some Netflix. In this example, I'm going to be focusing on deploying a static HTML website, but you really could do this for any sort of web application front-end. We will be highlighting how to do this using AWS, Terraform and Gitlab.
Let me just explain real quick why we'd want to do this.
First, this makes your life easier. You write the code, you make a commit, push, and your pipeline deletes old files from your S3 bucket, uploads the new files, sets permissions, and then invalidates your CloudFront distribution so that all you have to do is go look at your changes in production.
Second, it removes human error. You can't forget to upload files or invalidate a CF if your code does it for you.
Third, it speeds up your deployments because you no longer have to go ahead and do things manually. For all of these reasons, I always set up a pipeline for all of my personal and professional projects.
Enough of me rambling; let's get to work.

I like to make things as easy and reproducible as possible, so we'll be using Terraform to build out the infrastructure. If you don't have Terraform installed, then you didn't read the prerequisites (tsk tsk...) and I'm going to need you to install it. For the website's infrastructure, all we'll need is an S3 bucket and a CloudFront distribution. We'll just use a default CloudFront certificate since we aren't connecting this distribution to our domain name in this example.
Before we go any further, I would recommend creating a repository for all of your Terraform configs. It will just keep things more organized if you decide that you want to continue to use Terraform for configuring your infrastructure. Anyways...
Create a file named main.tf and paste this into. You can change the bucket_name variable to whatever you want, just make sure you set this correctly later on in another file (you'll see as I've highlighted where it needs to be adjusted in the code snippet).
variable "bucket_name" {
 default = "website.example.com" // change this}

provider "aws" {
  region = "us-east-1"
}

resource "aws_s3_bucket" "bucket" {
  bucket = "${var.bucket_name}"
  acl    = "private"
  policy = <<EOF
{
  "Version": "2012-10-17",
  "Statement": [
      {
          "Sid": "AddPerm",
          "Effect": "Allow",
          "Principal": "*",
          "Action": "s3:GetObject",
          "Resource": "arn:aws:s3:::${var.bucket_name}/*"
      }
  ]
}
EOF

  website {
    index_document = "index.html"
    error_document = "index.html"
  }
}

locals {
  s3_origin_id = "S3-${var.bucket_name}"
}

resource "aws_cloudfront_distribution" "s3_distribution" {
  origin {
    domain_name = "${aws_s3_bucket.bucket.bucket_regional_domain_name}"
    origin_id = "${local.s3_origin_id}"
  }

  wait_for_deployment = false

  enabled = true
  is_ipv6_enabled = true
  default_root_object = "index.html"

  default_cache_behavior {
    allowed_methods = ["DELETE", "GET", "HEAD", "OPTIONS", "PATCH", "POST", "PUT"]
    cached_methods = ["GET", "HEAD"]
    target_origin_id = "${local.s3_origin_id}"

    forwarded_values {
      query_string = false

      cookies {
        forward = "none"
      }
    }

    viewer_protocol_policy = "redirect-to-https"
    min_ttl = 0
    default_ttl = 3600
    max_ttl = 86400
  }


  price_class = "PriceClass_100"

  restrictions {
    geo_restriction {
      restriction_type = "none"
    }
  }

  custom_error_response {
    error_code = 403
    error_caching_min_ttl = 0
    response_code = 200
    response_page_path = "/index.html"
  }

  viewer_certificate {
    cloudfront_default_certificate = true
  }
}
Now run the config create the infrastructure
terraform init
terraform apply -auto-approve
Awesome! All of our infrastructure is set up in AWS and now we just need to set up our GitLab runner!
For this part, you'll need a GitLab repository for us to work with, so create a new one before proceeding.
Now that you have a repository, let's set up our runner. We're going to use a shared runner from GitLab. They're free to use up for up to 2,000 minutes of deployments per month -- and they're enabled by default. I've found that they're somewhat slow and it stinks that you're throttled at 2,000 minutes, so I usually use my own runners spun up in Kubernetes or on EC2 instances, but let's save that for another tutorial.
We need to supply the runner with an AWS IAM user to use to deploy to S3. Create another terraform config with this content:
variable "keybase_user" {
  description = "A keybase username to encrypt the secret key output."
 default = "dannextlinklabs" // change this}

provider "aws" {
  region = "us-east-1"
}


resource "aws_iam_access_key" "gitlab_ci" {
  user    = "${aws_iam_user.gitlab_ci.name}"
  pgp_key = "keybase:${var.keybase_user}"
}

resource "aws_iam_user_policy" "gitlab_ci" {
  name = "gitlab-ci-policy"
  user = "${aws_iam_user.gitlab_ci.name}"

  policy = <<EOF
{
    "Version": "2012-10-17",
    "Statement": [
        {
            "Effect": "Allow",
            "Action": [
                "s3:ListBucket"
            ],
            "Resource": "*"
        },
        {
            "Effect": "Allow",
            "Action": [
                "s3:PutObject",
                "s3:PutObjectAcl",
                "s3:GetObject",
                "s3:GetObjectAcl",
                "s3:DeleteObject"
            ],
            "Resource": [
 "arn:aws:s3:::website.example.com/*" // this needs to be set to your bucket name            ]
        },
        {
            "Effect": "Allow",
            "Action": "cloudfront:*",
            "Resource": "*"
        }
    ]
}
EOF
}

resource "aws_iam_user" "gitlab_ci" {
  name = "gitlab-ci"
}

output "access_key" {
  value = "${aws_iam_access_key.gitlab_ci.id}"
}

output "secret_access_key" {
  value = "${aws_iam_access_key.gitlab_ci.encrypted_secret}"
}
Make sure you set the keybase user to your own keybase user, because Terraform uses that to encrypt the IAM user's secret access key. This won't work if you don't have a Keybase account, or if you try to use my Keybase account.
Run the config.
terraform init
terraform apply -auto-approve
The terraform config returns an access key and an encrypted secret key for this user. We need to decrypt the secret key with the command (this is why you needed to use your own keybase user).
terraform output encrypted_secret | base64 --decode | keybase pgp decrypt
Now that we have the access key and the secret key for our GitLab user, we just to supply these variables to our runner by adding them to the variables section in the CI/CD settings.
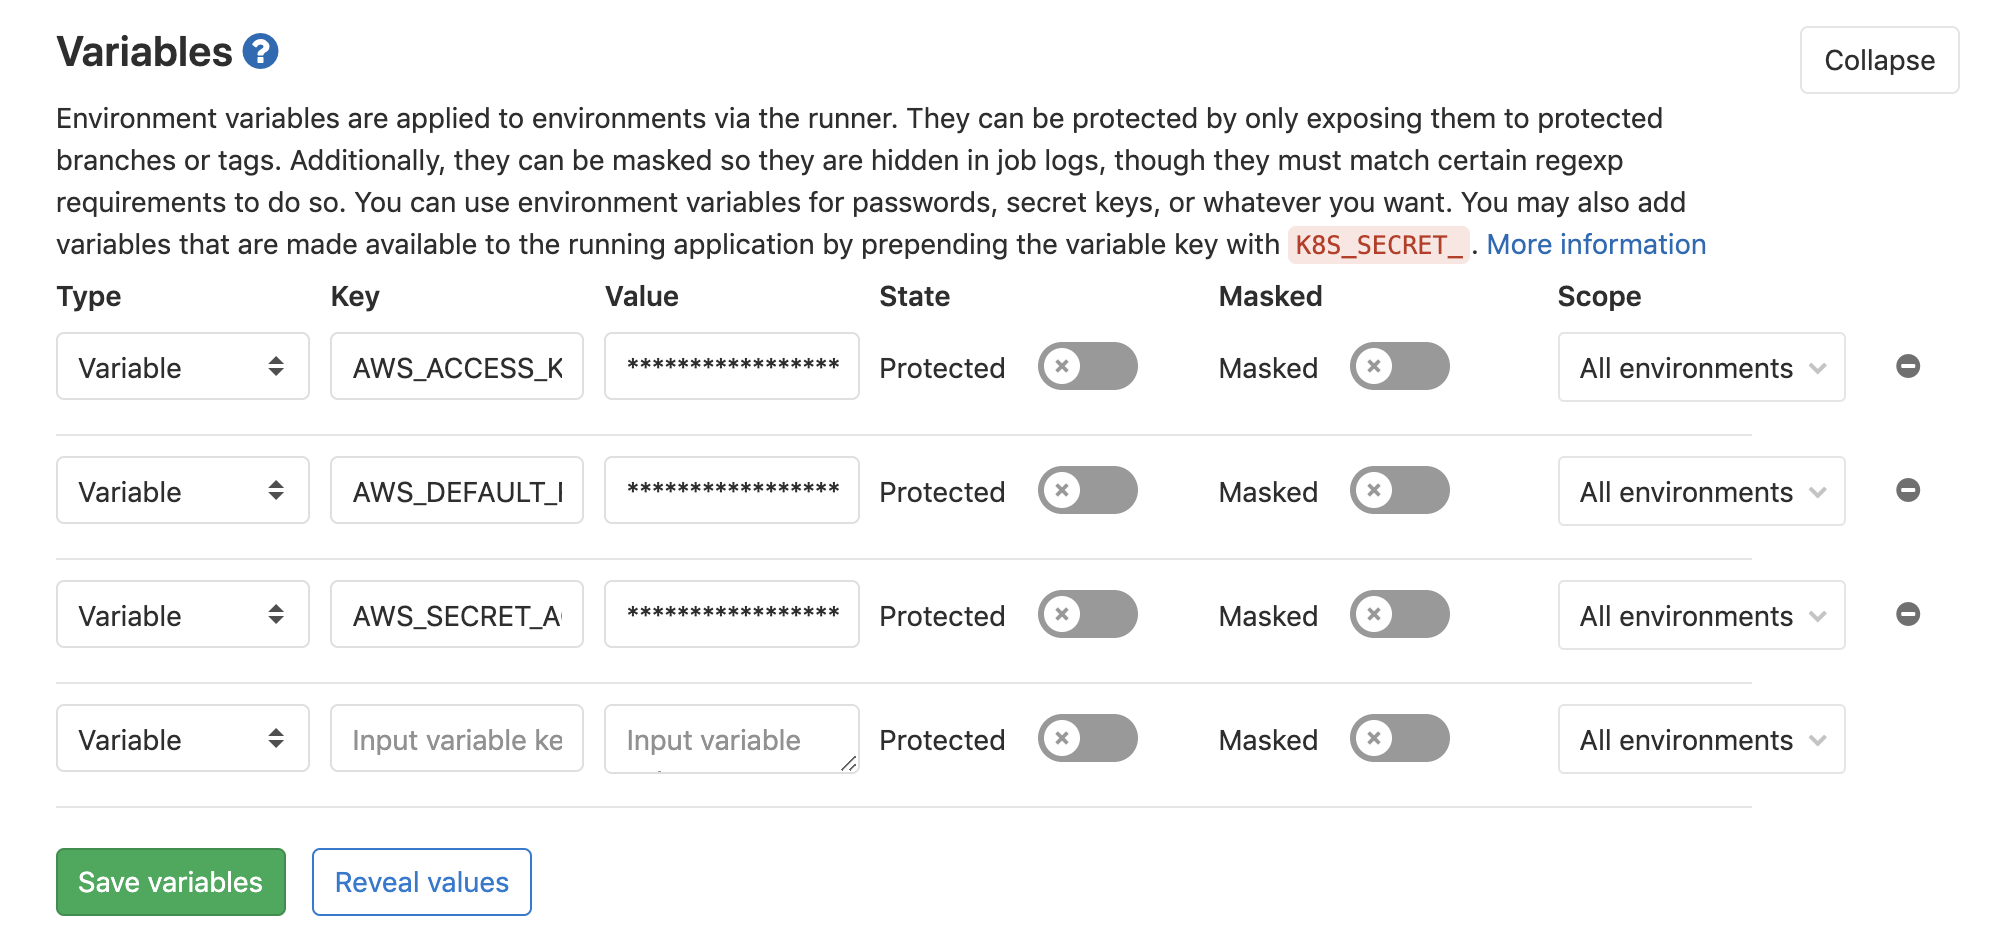
We need to set three variables in GitLab:
AWS_ACCESS_KEY_ID - the access key that Terraform returned to us
AWS_SECRET_ACCESS_KEY - to the secret access key we just decrypted
AWS_DEFAULT_REGION - us-east-1
We have an empty repository set up with our GitLab runner enabled, so let's commit our website code.
Create an index.html file that contains this code:
<html>
  <body>
    <h1>Super cool website!</h1>
    <p>
      Lorem ipsum dolor sit amet, consectetur adipiscing elit, sed do eiusmod tempor incididunt ut labore et dolore
      magna aliqua. Ut enim ad minim veniam, quis nostrud exercitation ullamco laboris nisi ut aliquip ex ea commodo
      consequat. Duis aute irure dolor in reprehenderit in voluptate velit esse cillum dolore eu fugiat nulla pariatur.
      Excepteur sint occaecat cupidatat non proident, sunt in culpa qui officia deserunt mollit anim id est laborum.
    </p>
  </body>
</html>
Commit that and push it to the repo, and that will be all we need for the "design".
GitLab CI/CD is based around a file called .gitlab-ci.yml. GitLab requires that file to be located in the root of your project. Our file needs to look like this:
stages:
  - deploy-s3
  - deploy-cf

variables:
 AWS_BUCKET: website.example.com // change this if necessary
deploy_s3:
  image: python:3.6
  stage: deploy-s3
  tags:
    - docker
    - gce
  before_script:
    - pip install awscli -q
  script:
    - aws s3 sync . s3://$AWS_BUCKET/ --delete --acl public-read
  only:
    - master

deploy_cf:
  image: python:3.6
  stage: deploy-cf
  tags:
    - docker
    - gce
  before_script:
    - pip install awscli -q
  script:
    - export distId=$(aws cloudfront list-distributions --output=text --query 'DistributionList.Items[*].[Id, DefaultCacheBehavior.TargetOriginId'] | grep "S3-$AWS_BUCKET" | cut -f1)
    - while read -r dist; do aws cloudfront create-invalidation --distribution-id $dist --paths "/*"; done <<< "$distId"
  only:
    - master
This gitlab-ci file sets up two stages: deploy-s3, and deploy-cf. The first stage uploads our website to the S3 bucket, and the second invalidates the CloudFront distribution for that bucket in order to present the new changes to our website! This simple configuration is all you need to have a complete CI/CD pipeline for your business' website.
Commit and push those changes, and then checkout the pipelines section under the CI/CD tab in that project. You should see a deployment running. Success! You have a working CI/CD pipeline. Now, whenever you commit code to the master branch, GitLab will auto-magically upload and distribute your changes!

Hopefully this tutorial was useful and has introduced you to GitLab's CI/CD pipelines. Here at NextLink Labs, we are constantly improving our clients' deployment infrastructure and we love doing it. Do you have a complex devops task that you need some help tackling? Well then, reach out to us! We'd love to chat.

 DevOps
Learn how to add Grafana observability to any AWS Fargate service using a Grafana Alloy sidecar and a single Terraform module block — CPU, memory, network, and trace signals flowing in under five minutes.
 Aru Shanmugam
·
Jun 3, 2026
Aru Shanmugam
·
Jun 3, 2026
 DevOps
A Jenkinsfile with one stage, no scanning, no caching. Here's how NextLink Labs used Claude Code to rewrite it into a production GitLab pipeline with rootless BuildKit, Trivy scanning, Skopeo retag, and a proper DAG — in under an hour.
 Alex Podobnik
·
Apr 28, 2026
Alex Podobnik
·
Apr 28, 2026
 DevOps
Someone set that up manually a while back. Sound familiar? Here's how NextLink Labs uses Claude Code's agentic loop to import hand-built AWS infrastructure into Terraform — compressing a multi-day job into an afternoon.
Alex Podobnik
·
Apr 24, 2026
 DevOps
Most LLM-generated Terraform is bad — not because of the tool, but because of the prompt. Here's how NextLink Labs uses Claude Code and CLAUDE.md conventions to generate Terraform modules that are close to merge-ready.
Alex Podobnik
·
Apr 24, 2026